Posts filed under Tips'n Tricks

Domotica Babysteps

The first steps with domotica have been made over here. We now have an overview of our electricity and gas usage by using a smart-meter with solar-panels and a Raspberry Pi with Domoticz software.

The image below indicates that the solar panels are delivering 558W at that moment and the smart-meter reports that it's delivering to the net (139W). So we were self sustaining at that moment.

Actual electricity and gas usage

Some statistics over the last couple of days indicate that we produce more electricity than we consume. Don't think that those graphs look anything like this during the winter though :-)

The green columns are topping the blue, so we're making 'money' on those days. And that 'money' will most likely be consumed during the winter period, when solar output is much less.

Electricity consumption during the week where green is good :-)

I'll make a more extensive post about the set-up in due time, but for now, these are the things I used:

Total cost: ~75 euros (Raspberry Pi 2B starter kit + Smart meter cable), and a crap-load of time (experimenting, research, etc.).

Next steps are adding z-wave functionality to the set-up for more monitoring enhancements.


Posted on July 12, 2015 and filed under Raspberry Pi, Personal, Tips'n Tricks.

Custom Raspberry Pi Console Login Message

The Raspberry Pi tweaking continues. I did a fresh install of my first project to make sure that I documented all the steps correctly. To make sure I didn't loose any work I created a backup of the SD card.

The documentation was relatively complete. I did miss some things I added to the Pi, but forgot to document. One of these was a nicer welcome screen when you log in to the Pi via console or SSH.

I added the following to the /etc/bash.bashrc file for all users, or just in the ~/.bash_profile file (at the end):

let upSeconds="$(/usr/bin/cut -d. -f1 /proc/uptime)"
let secs=$((${upSeconds}%60))
let mins=$((${upSeconds}/60%60))
let hours=$((${upSeconds}/3600%24))
let days=$((${upSeconds}/86400))
UPTIME=`printf "%d days, %02dh%02dm%02ds" "$days" "$hours" "$mins" "$secs"`

# get the load averages
read one five fifteen rest < /proc/loadavg

echo "$(tput setaf 2)
   .~~.   .~~.    `date +"%A, %e %B %Y, %r"`
  '. \ ' ' / .'   `uname -srmo`$(tput setaf 1)
   .~ .~~~..~.   
  : .~.'~'.~. :   Uptime.............: ${UPTIME}
 ~ (   ) (   ) ~  Memory.............: `cat /proc/meminfo | grep MemFree | awk {'print $2'}`kB (Free) / `cat /proc/meminfo | grep MemTotal | awk {'print $2'}`kB (Total)
( : '~'.~.'~' : ) Load Averages......: ${one}, ${five}, ${fifteen} (1, 5, 15 min)
 ~ .~ (   ) ~. ~  Running Processes..: `ps ax | wc -l | tr -d " "`
  (  : '~' :  )   Local IP Addresses.: `hostname -I`
   '~ .~~~. ~'    WAN IP Address.....: `wget -q -O - http://icanhazip.com/ | tail`
       '~'        Weather............: `curl -s "http://rss.accuweather.com/rss/liveweather_rss.asp?metric=1&locCode=EUR|NL|NL001|UTRECHT|" | sed -n '/Currently:/ s/.*: \(.*\): \([0-9]*\)\([CF]\).*/\2°\3, \1/p'`
$(tput sgr0)"

The result is this:

I got the 'original' script form the Raspberry Pi forum, and I altered the IP Address section and the weather forecast.

Posted on June 22, 2015 and filed under Tips'n Tricks, Raspberry Pi.

Rsync And Encrypted Containers

My 'little' off-site Raspberry Pi backup/remote storage project will probably use a combination of Bittorrent Sync and rsync. The latter will be used to backup personal information, but I want that data to be absolutely secure. So I want to use encryption. Preferably by using container that I can mount (e.g. Truecrypt or the Apple OSX encrypted disk images).

The problem with containers is that many backup solutions tend to backup / transfer the entire container when a change occurred. Thankfully, rsync only copies the changes.

Posted on June 20, 2015 and filed under Raspberry Pi, Security, Software, Tips'n Tricks.

Raspberry Pi 2 and PiTFT 480x320 Touchscreen

I'm starting to experiment with the Raspberry Pi form several purposes. For one of my little projects (RTL-SDR Scanner) I need a little TFT screen on the Pi. So I bought the 3.5 inch PiTFT 480x320 Touchscreen.

Getting it to work was not as easy as the tutorial would like it to be. I tried the 'advanced' setup with the DIY Installer script first, but that didn't work at all. The screen stayed bright white. No console or desktop to be found. So after that I tried the easy install where I needed to download an image with all the stuff included.

Posted on June 2, 2015 and filed under Tips'n Tricks, Hardware, Raspberry Pi.

Create An 802.1x Evil Access Point

The last couple of weeks, I've been playing with Kali Linux to explore exploits on networks (wireless and switched networks). One of the exploits I'd liked to explore was that of an 'Evil Access Point' which can be done with Kali Linux and a suitable wireless LAN adapter.

An Evil Access Point creates an wireless network SSID to lure unsuspecting users/computers in to connecting to it. This network is pretending to use 802.1x for security (which is mainly used in corporate network environments), and those networks require typically a username and password (or certificate) to connect.

When the user/computer tries to connect, it (the evil AP) collects the user-name and a hash of the password. The password can be recovered by using dictionary files, rainbow tables, or by using brute-force. After the password has been found it can be used with the captured user-name to connect to the corporate network.

Posted on April 12, 2015 and filed under Security, Tips'n Tricks.

Log Conversation Only with TCPDUMP

Not exactly the conversation view from Wireshark, but it's a relatively clean and readable output showing the source, destination IP addresses, and ports.

tcpdump -q -i <interface>

Add the '-t' switch to remove the time stamp as well

Posted on March 27, 2015 and filed under Tips'n Tricks.

OS X Yosemite DHCP Server

This week I re-installed my Mac Mini server at home. It still ran Snow Leopard, and it was time to start with a clean slate. So after a couple of hours of pondering if I had forgotten to backup something, I started with a clean install of OS X Yosemite (10.10).

Everything went smooth, until I started using the DHCP service that comes with the Server App add-on.

My server uses 802.1q (VLAN-tagging) to connect several different VLAN's which I feed into several Virtual Machines. So I also use several DHCP Scopes for those segments.
The IP addresses for these scopes are all in the 192.168-range (class C subnets), so when I created the scopes I had to go through a simple wizard in the Server App. I just had to fill-in the blanks (very user friendly), and OS X did the rest.

Upon testing I ran into the weirdest behaviour on my network. Getting connectivity with a device took a very long time, and when the device got an IP address, it was from a different network (???)> So it couldn't communicate across the network.

At first I began to wonder if I had mixed up the VLAN names and tags, but those were correct. After an hour of troubleshooting (more and more DHCP clients were failing in the network), I found the problem;

When you create a scope Apple will assign a default subnet mask (255.255.0.0). I guess I should have seen it, but I didn't.

After I changed the subnet mask in the DHCP scopes everything went back to normal.

Lesson learned: Don't rely on wizards and other user-friendly stuff.

Posted on December 31, 2014 and filed under Apple, Annoying, Tips'n Tricks.

PlayStation Network Down and How To Get It Working Again

This Christmas (2014), several gaming networks were attacked by a DDoS. One of those networks being the Playstation Network (PSN). This resulted in severe downtime during the holiday season. Sony is/was working hard to resolve this and service is being restored all around the world. Except for me (and probably several thousand other gamers). As of this morning (December 29th, 2014) I was unable to log on to PSN. All I got was one of the much telling error codes:

NW-31456-9

CE-33987-0

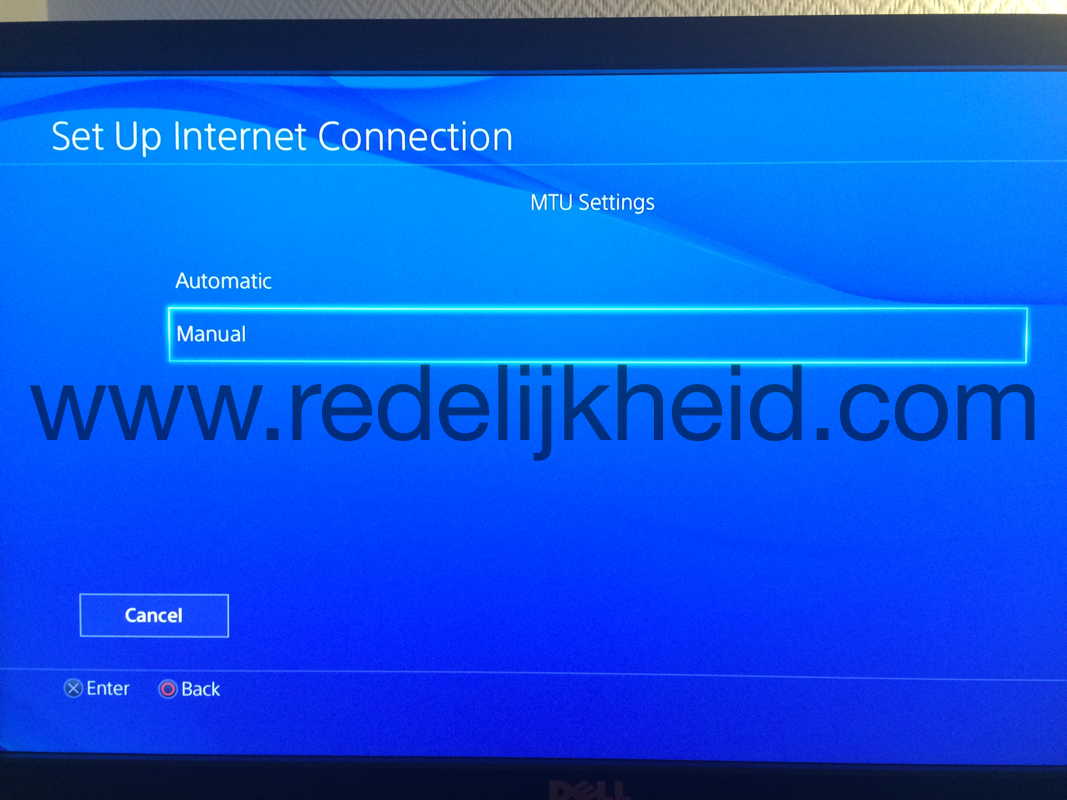
Someone on the Interwebs mentioned that a change in the MTU size might help. The MTU size is the maximum transfer unit on a network, which is normally at 1500 (bytes) for regular network clients. In some case it's preferable to adjust this size (I won't get into details).

In the case of PSN being down, an adjustment from 1500 (the default) to 1473 seems to do the trick at the moment. Not sure if it wil hold up in the (near) future, but at least you can get online to play on your new Playstation 4 or with the new game you got for Christmas.

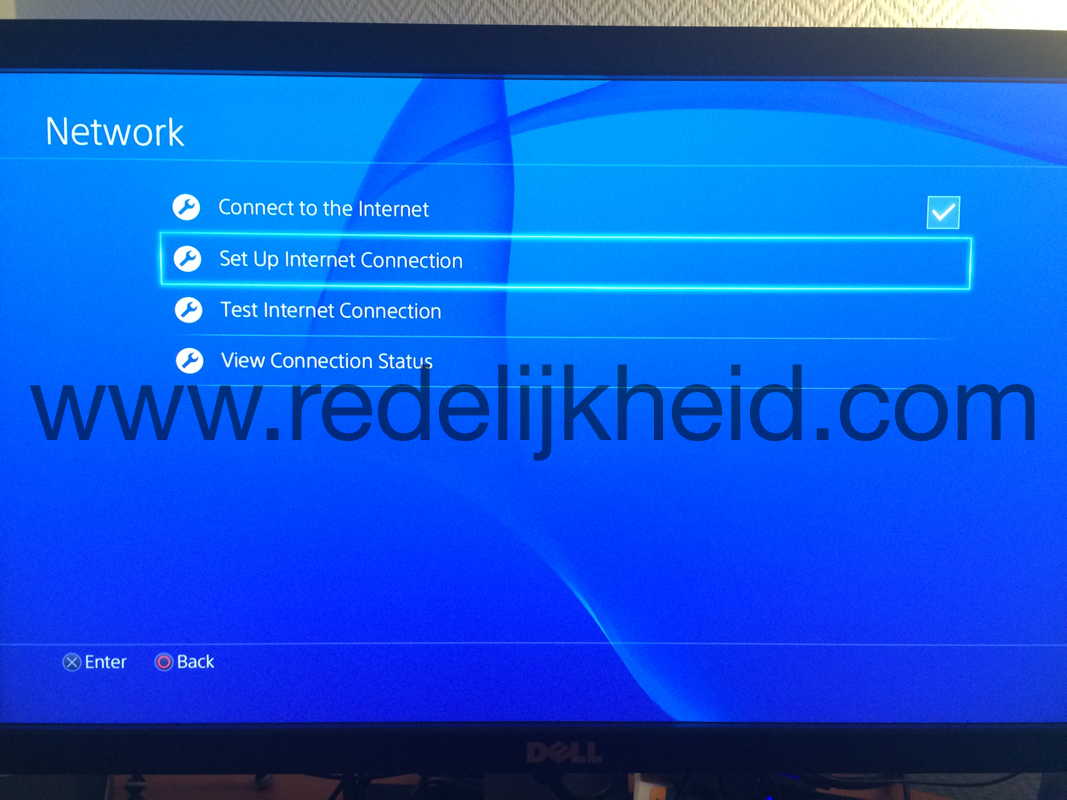
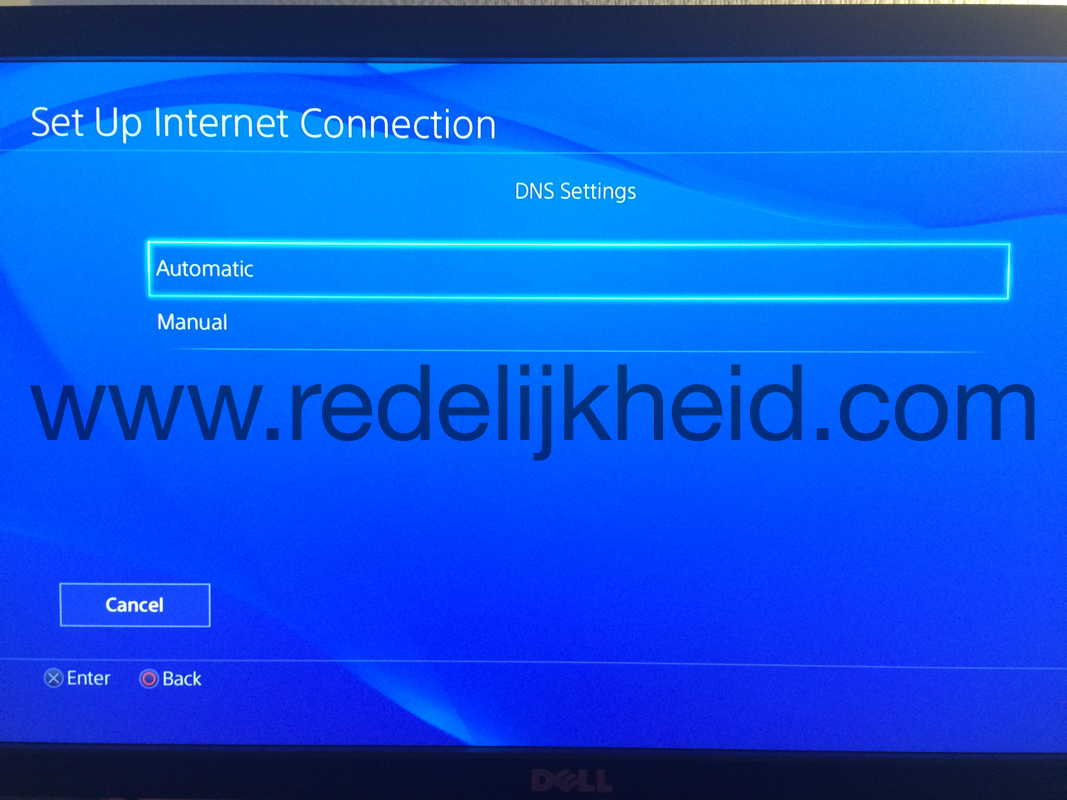
  1. Go to the “Settings” menu.
  2. Go to “Network” sub-menu.
  3. Go to "Set Up Internet Connection".
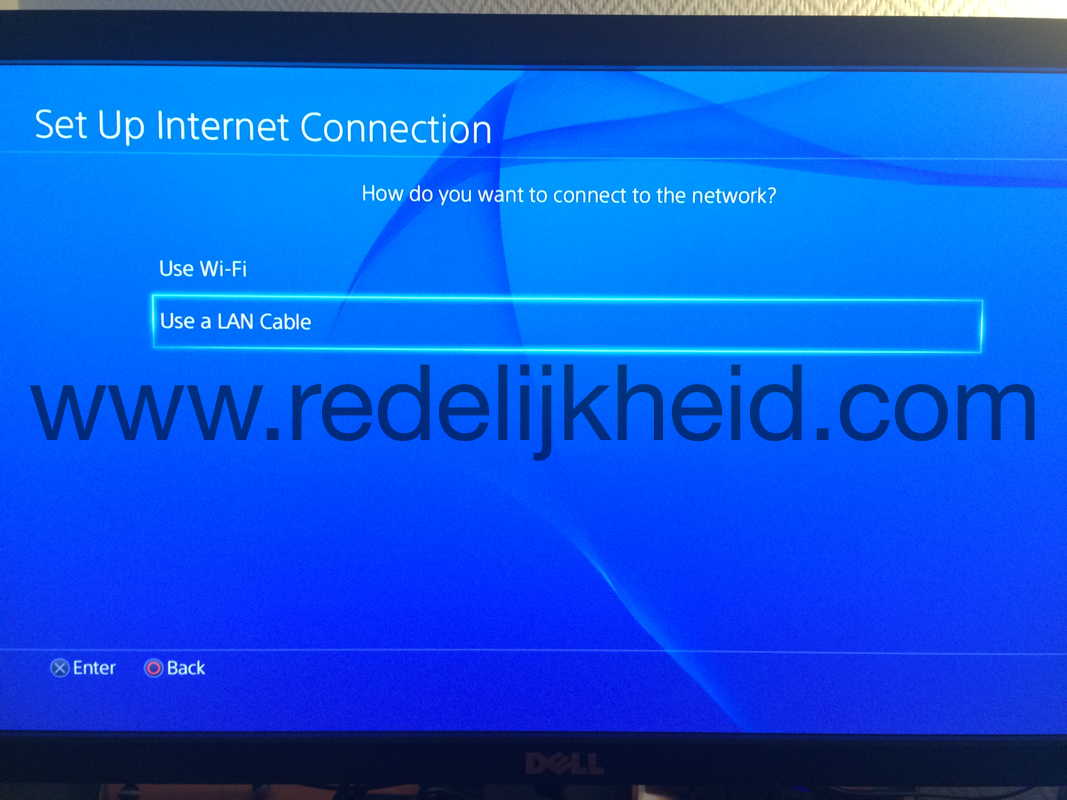
  4. Choose your media (WiFi or LAN).
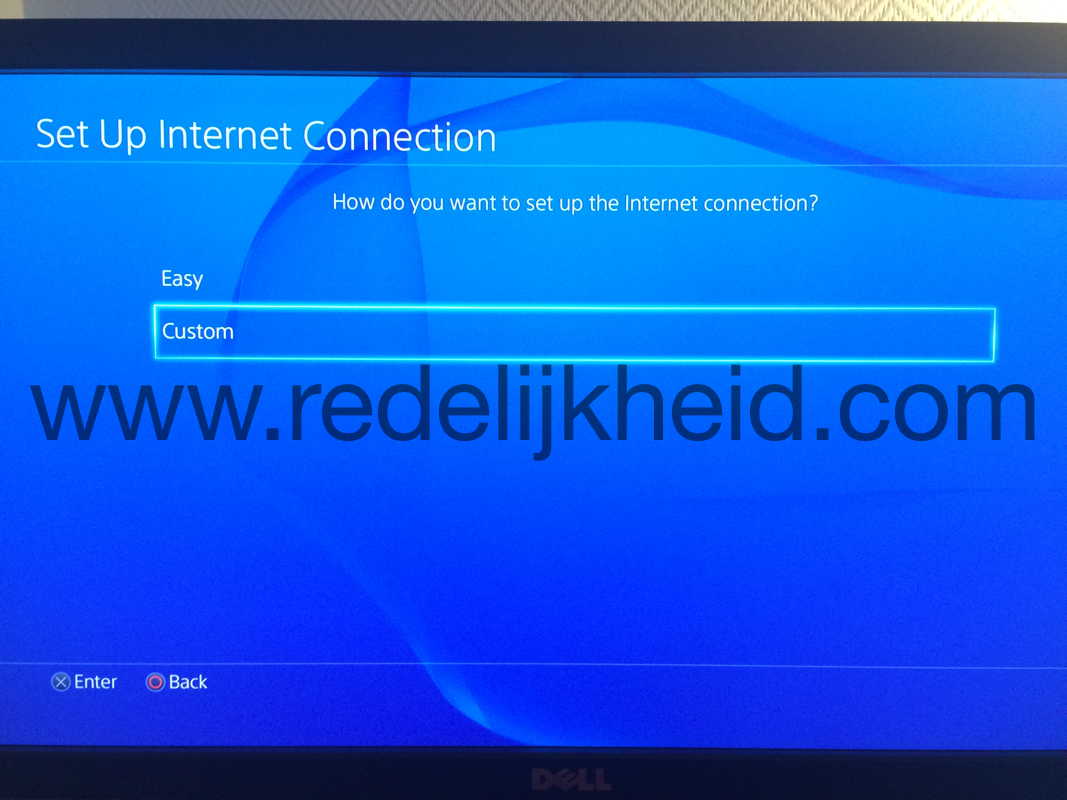
  5. Choose “Custom.”
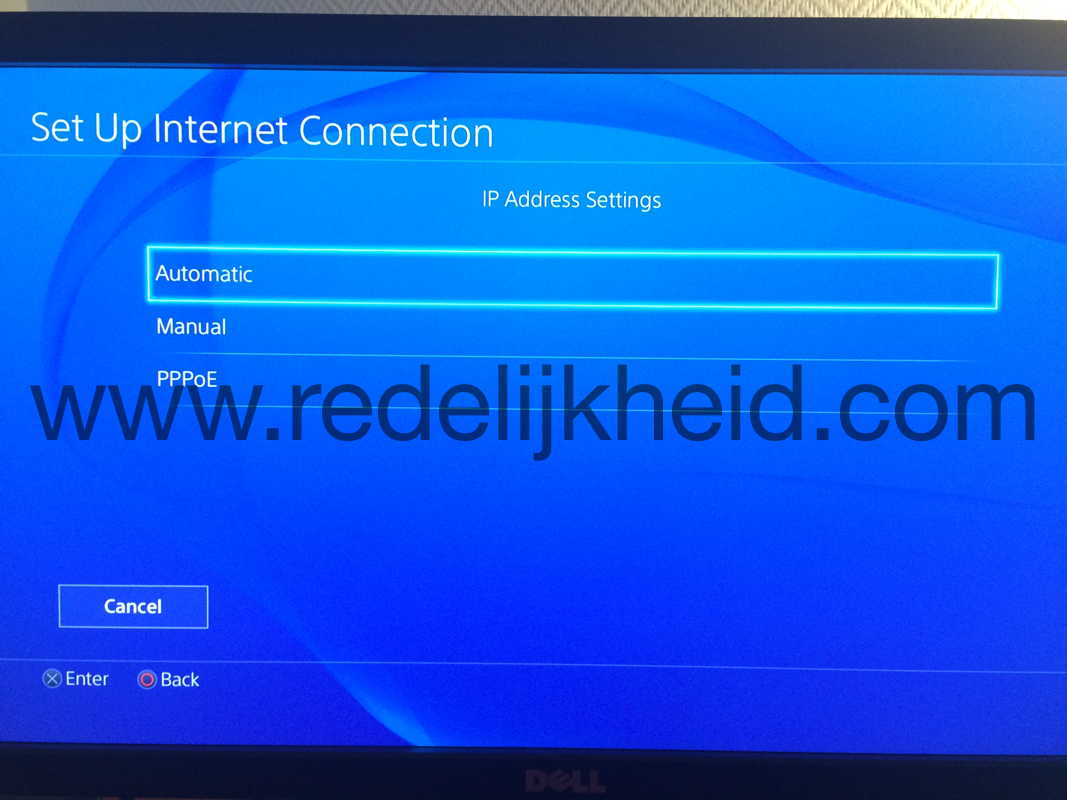
  6. Leave everything as default except MTU (Manual).
  7. Change MTU settings to “1473”.
  8. Save your changes.
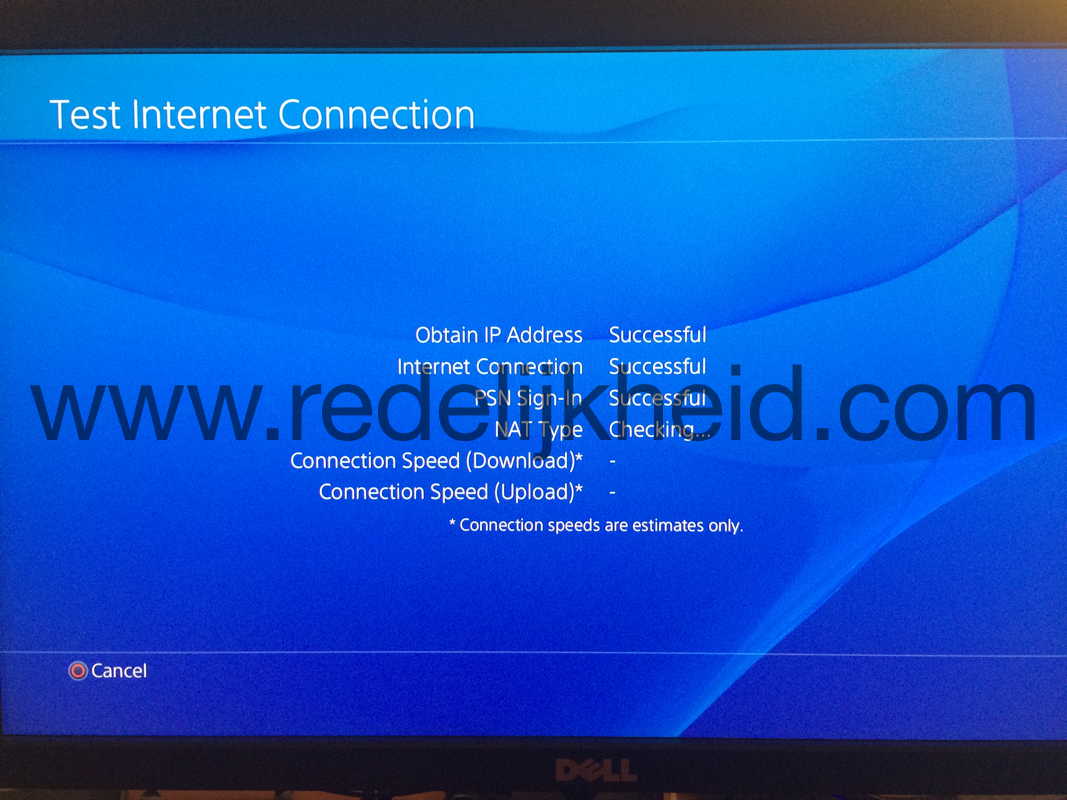
  9. Test the Internet connection.

And if you are more of a visual kinda person:

Everything should work now. If not, you may try a reboot.

Lowering the MTU size means that smaller packets are being send over the network (max. 1473 bytes instead of 1500 byte packets) , this is not a bad thing, but might lead to some performance problems in some cases. Just remember that you changed this setting. You want to (or have to) change this back to the default (1500) in the future.

I do not know if this works for other gaming devices. You may try at your own risk (and leave the results in the comments if you'd like).

UPDATE: As of this morning I was able to sign in to PSN with an MTU of 1500 (access the Playstation Store etc.), but I was unable to play online games (Battlefield 4). Changing the MTU back to 1473 fixed that (again).

UPDATE 2: As of this morning (31 december) I can also connect to PSN with an MTU of 1500, so everything is back to normal.

Posted on December 29, 2014 and filed under Annoying, Tips'n Tricks, Gaming.